...
This article will provide instructions on how to set up your gateways and gateway categories.
Add a Gateway Category
You will want to categorize your gateways by the corp they were acquired by. This is necessary to prevent cross-corping.
Select Gateways → Gateway List then click the green + Button located next to the blue Edit Button:
...
the green + Category button.
...
A pop up box will appear. Put the new category name in the field and click on the green the green Create Category Button button.
...
...
Create a
...
New Gateway
Select Gateways > then click on Gateway → Gateway List > then click the smaller green + button:
...
Enter a Gateway Title and select the category.
Select the desired Gateway and enter the credentials for the gateway.
...
...
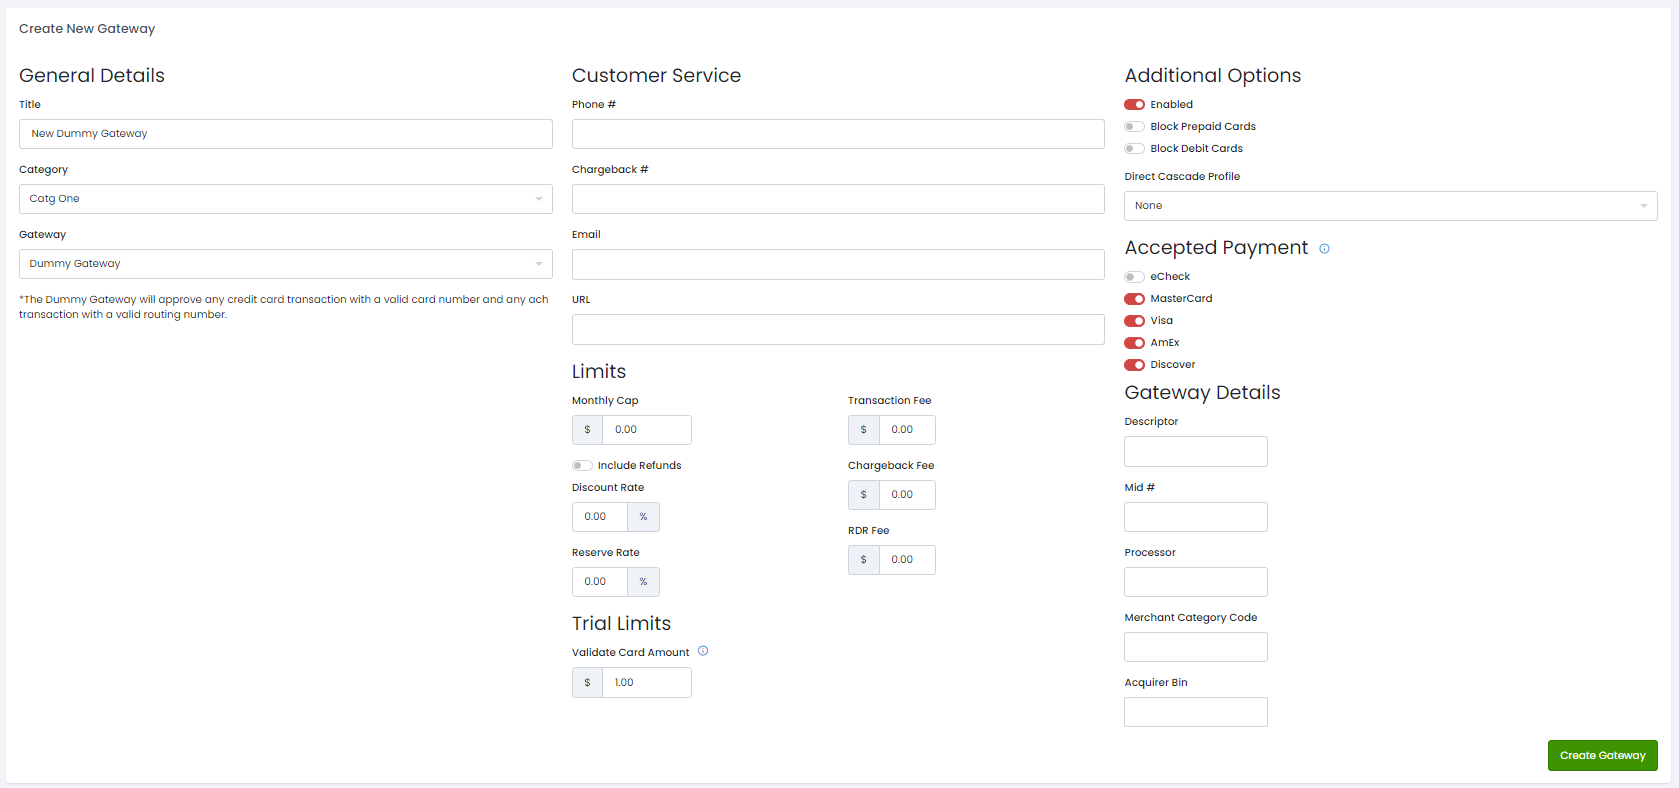 Image Added
Enter the gateway information into the General Details section.
| Note |
|---|
Gateways will also have additional inputs. These inputs will be different depending on the gateway, but at least one will relate to required credentials as provided by the merchant provider. For more information on your specific gateway, please locate it in Gateways. |
(Optional) Enter the contact information related to the Gateway in the Customer Service section
...
| Info |
|---|
(Optional: Used for tokens on autoresponders)Used in autoresponders Phone # :- The customer service phone number that customers should call related to this the gateway. Chargeback # :- The customer service phone number for chargebacks on the gateway. Email #:- The customer service email that customers should use related to the gateway. URL :- A support web page related to the gateway.
|
...
...
(Recommended) Enterthe gateway
...
...
...
| Info |
|---|
Used for various calculations related to gateway costs Monthly Cap - This is the total volume per month that is allowed to process on the gateway. The CRM can calculate your cap usage two different ways: The first calculation includes only gross billings against the gateway and ignores refunds (this is default). The second calculation shows net billings and includes refunds to give the net billings for the month. You can enable the second option by checking Include Refunds.
Discount Rate - The discount rate associated with the processor. This a percentage of volume taken by the bank on every sale. Reserve Rate - This is a percentage on billings that the bank keeps in a rolling reserve. Transaction Fee - This is a flat rate that is charged by the gateway for each transaction. Reserve Rate Chargeback Fee - This is a percentage on billings that the bank keeps in a rolling reserve. Chargeback Ratio - This is the threshold for Chargeback rates.
|
...
Enter the Descriptor and Mid #, these are required and can be acquired by the merchant provider.
...
When you are finished entering the information for the MID, click Create Gateway button.
| Info |
|---|
Additional Options and Accepted Payment: flat rate that is charged by the gateway for each chargeback. RDR Free - This is a flat rate that is charged by the gateway for each RDR refund. See RDR for more information.
|
Select the desired Additional Options.
| Info |
|---|
Enabled - Whether or not to allow any sales on the gateway. When this box is deselected, no sales are allowed to process against the gateway. Block Pre-Paid Prepaid Cards - Whether or not to allow prepaid cards to process against the gateway. If checked, prepaid cards will be blocked. Block Debit Cards - Whether or not to allow debit cards to process against the gateway. If checked, debit cards will be blocked. Echeck - check Direct Cascade Profile - (Optional) The cascade profile used to reattempt soft declined initial transactions. See Cascade Profiles for more information.
|
Select the desired Accepted Payments.
| Info |
|---|
eCheck - Check this if your gateway allows eCheck transactions. Mastercard - check Check this if your gateway allows Master MasterCard Cards. Visa - check Check this if your gateway allows Visa Cards. AmEx - Check this if your gateway allowed allows American Express Cards. Discover - Check this if your gateway allowed Discover.
Note: |
Enter the gateway information into the Gateway Details section. These are all acquired by the merchant provider.
| Info |
|---|
Descriptor - The descriptor as provided by the merchant provider. Mid # - The mid number as provided by the merchant provider. Processor - The processor as provided by the merchant provider. Merchant Category Code - The merchant category code as provided by the merchant provider. Acquirer Bin - The acquirer bin as provided by the merchant provider.
|
| Note |
|---|
Please review all information for accuracy before creating |
...
When you are finished entering your gateway information, click the green Create Gateway button.