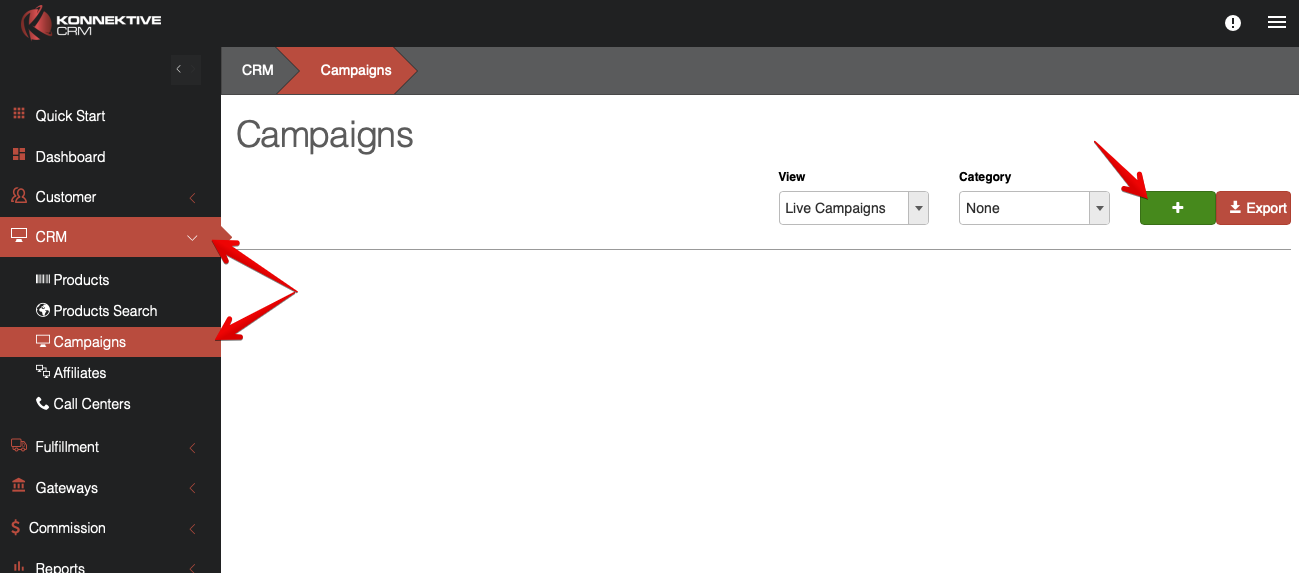
To create a campaign, navigate to CRM → Campaigns then click on the smaller green “+” button within a category to add a new Campaign.
If this is your first campaign, use the larger green “+” button to create campaign categories to organize your campaigns
You will then set the Campaign Name and choose the Campaign Type.
Phone– Processes transactions inside of the CRM via Order Entry.
Lander– Processes transactions through Web Pages with support of our Form Code Integration or use of our API calls.
Ecommerce– Processes transactions through Web Pages, typically used for web pages utilizing our Shopping Cart feature through our Form Code Integration or if the web page is configured through WordPress.
Click Submit to create the campaign. Then locate on your campaign list and click Edit
Once you create the campaign, there are several sections within that you need to configure:
On the left is the General Details. Here you can apply a multitude of features.

List in Order Entry (Phone Campaigns Only) - The campaign will be listed as an option on the Order Entry screen, making it available to sales agents.
Quality Assurance - Konnektive's Quality Assurance system by percentage entered for secondary review. These Cards will be authorized at the time of sale, but not captured until the order is specifically approved through the QA system. Set desired % for QA. Default is 100% .
Must Agree to ToS - This option specifies that the customer must specifically agree to the merchant's terms of service. This is done by checking a box either on a web form or in sales order entry.
Require eSignature (Online Campaigns Only) - This option allows merchants to require a customer electronic signature when checking out from landing page funnels. The system will create a PDF document containing the terms of service, customer eSignature, ipAddress and signature timestamp. This PDF contract can be emailed to the customer on order completion and used to fight chargebacks with card issuers.
Preauth Only (Phone Campaigns Only) - Only a single $1.00 authorization will be applied against the customer's card. This is generally used by call centers who are taking orders for third party merchants.
Retail Orders - Orders will be approved for shipment according to retail terms set on the campaign. Generally, the retailer is given a certain amount of time to complete payment or the order is placed in a diliquent status.
Block Prepaid Cards - Reject any sales using a prepaid credit or debit card.
Disable External Payments - This disables the "Prepaid" Order Entry payment option, which records payments taken outside the CRM system such as mailed-in checks.
Single Transaction - Combine all offers and upsells into one transaction.
Capture on Shipment - Charges will be authorized at the time of the initial sale only captured once the fulfillment has been updated with a tracking number.
Note: This can be set in conjunction with Chargeback Protection (configured on the Campaign Product). In the case both are enabled Capture on Shipment will only affect the initial order.
Bundle Fulfillment - This option will bundle fulfillments that are within 96 hours of each other when they are shipped to the same customer. The main purpose of this option is to save money on the number of fulfillments exported to a fulfillment house.
Note: Setting this will delay the shipping API so that all products in the order will be bundled together.
Offer Shipping Insurance - If you have a shipping service plugin enabled, you can choose whether to offer it for this campaign.
Chargeback Blacklist - Use Konnektive's global chargeback blacklist to block any customers who has ever chargebacked a transaction. (Data points used are email, and phone number)
Maximum Coupons - The maximum number of coupons allowed per order.
Reorder Days - This option restricts customers from purchasing against this campaign again for the amount of days entered. This option can be easily applied to all campaigns with the Apply to All button.
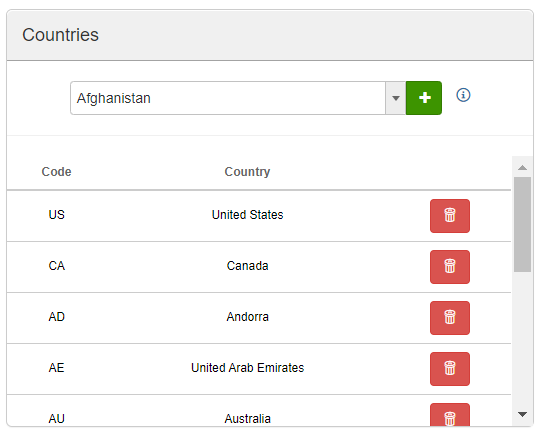
To the right of that you have the Countries where you have the ability to choose where you want to sell your products. Just click the Drop-Down> Choose the county > Click Add
Please view this article for instructions on how to add products to your campaigns.
If you are using Konnektive’s form-code to do your website integration, please follow this article.
Depending on the campaign type you chose, you will either see an Affiliate section or a Call Center section. You also have the ability to add a new affiliates/call centers and set commission for step 1 and step 2 products.
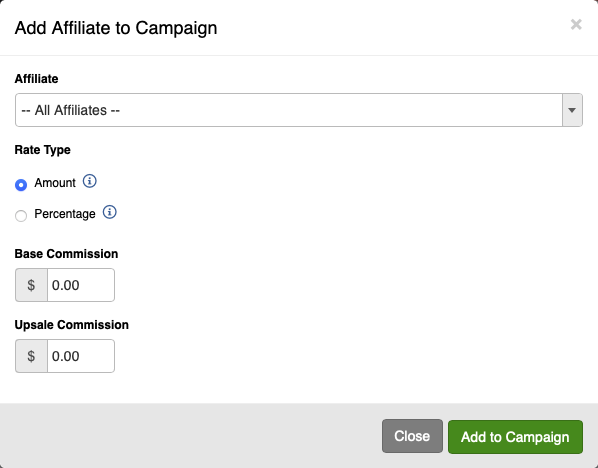
Click the green “+” button within the Affiliate/Call Center section. Choose the Affiliate/Call Center, set the Rate, then input the Base and Upsale Commission. When finished, click Add to Campaign.
For more information on setting up affiliates and call centers, please view these articles:
Affiliate Setup & Call Center Setup
Here you have the option to send automatic emails to your customers. For more information on auto-responder setup, please view this article.
Here you will have the option to apply sales tax to specific states or all states. Click on the green + Button.


Choose the Country, State, and Tax Rate then click Submit.
Here you will have the option to create coupons whether they be one time or recurring. Click on “Create Coupon”


Choose what the coupon code will be.
Choose whether it applies the Base Price of the product being purchased or the Shipping Price.
Choose the Discount Type which will be a Flat Rate or Percentage Discount.
Choose if this coupon applies to the Whole Order or a specific product.
If this is a recurring coupon you will click the checkbox and you willsee 3 additional options:
Initial Discount- This is the discount applied to the trial or first transactions.
Recurring Discount- The amount discounted on rebills.
Maximum Cycles- How long the discount will last. Then click Submit
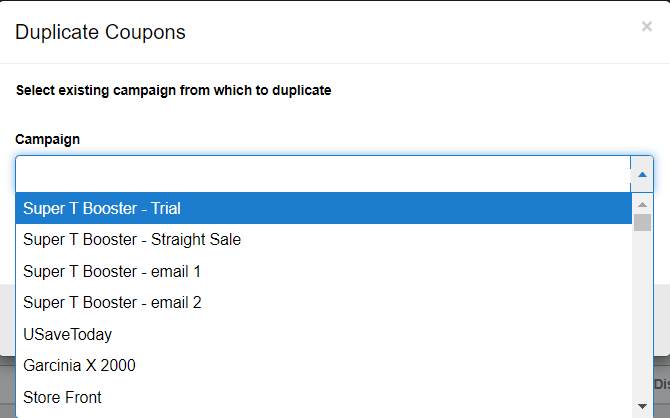
Duplicate Coupons:
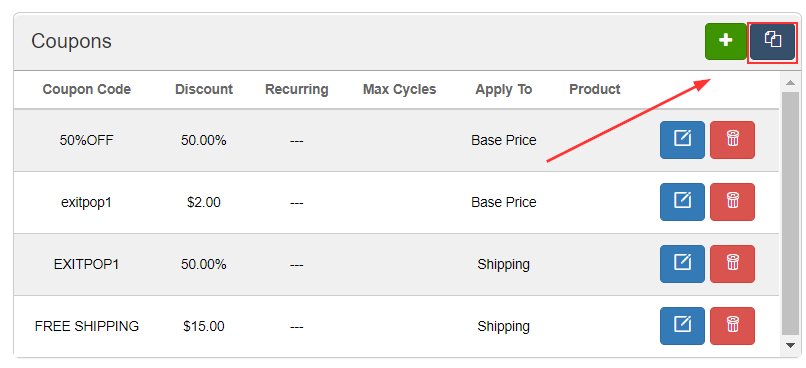
To duplicate a coupon, navigate to the campaign where you want to have the coupons added. Scroll to the coupon section, click "duplicate", then choose the campaign in which you want to duplicate coupons.
Once you submit the form all the coupons from the originating campaign will be added to the other campaign.
Please view this article for more information on Shipping Profiles
Please view this article for more information on Custom Fields
Here you can add terms of service for the campaign that can be accessed on any form-code landers or shopping carts and can be combined into a customer contract PDF for orders with eSignatures.

